JavaScript Workshop
Web ·Workshop #3 - Adding Interactivity with JavaScript
Building on our recipe website from last week, we’ll add some fun interactive features using JavaScript! If you haven’t completed the previous workshops, you can find them here:
Starting Fresh? Use This Code!
If you haven’t completed the previous workshops, you can use this starter code to follow along:
<div class="code-header">

<span class="filename">recipes.html</span>


<button class="copy-code-button" aria-label="Copy code to clipboard">
  <span class="copy-text">Copy</span>
</button>
</div>
<head>
    <title>Recipes</title>
    <link rel="stylesheet" href="https://cdn.jsdelivr.net/npm/@exampledev/new.css@1.1.2/new.min.css">
    <link rel="stylesheet" href="styles.css">
</head>
<body>
<header>
    <h1>Recipes</h1>
        <nav>
            <a href="index.html">Home</a>
            <a href="projects.html">Projects</a>
            <a href="recipes.html">Recipes</a>
        </nav>
    </header>
    <div class="container">
      <div class="recipe">
            <img src=https://rakskitchen.net/wp-content/uploads/2014/06/14336259454_504e87ce37_z.jpg>
            Baingan Bharta
      </div>
      <div class="recipe">
            <img src=https://www.cookerru.com/wp-content/uploads/2022/06/mapo-tofu-recipe-preview-feature-500x500.jpg>
            Mapo Tofu
      </div>
    </div>
</body>
h1 {
  color: black;
}
.recipe {
  display: flex;
  flex-direction: column;
  align-items: center;
}
.container {
    display: flex;
    justify-content: center;
    gap: 20px;
}
.favorite-recipe {
  display: flex;
  flex-direction: column;
  align-items: center;
  padding: 5px;
  background-color: gold;
}
What is JavaScript?
JavaScript is a programming language that makes web pages interactive. While HTML structures our content and CSS styles it, JavaScript adds behavior and interactivity. Think of it like this:
- HTML is the skeleton (structure)
- CSS is the skin and clothes (appearance)
- JavaScript is the muscles and brain (behavior)
Setup
- Open your recipe website project from last week in Trinket
- Create a new file called
script.js - Add this line to the
<head>section of yourrecipes.htmlfile:<script src="script.js"></script>
Project: Interactive Recipe Buttons! (20 minutes)
Let’s make our recipe page more engaging by adding two interactive buttons to each of your recipes. We’ll walk through the first one step-by-step, and then you’ll repeat the process for the second one.
Step 1: Update the HTML for the First Recipe
First, we need to modify the HTML for the first <div class="recipe"> block in your recipes.html.
- Add a Paragraph for the Name: Inside the first
div, wrap the recipe’s name (e.g., “Baingan Bharta”) in a<p>tag and give it the unique IDid="recipe-name-1". This ID allows our JavaScript to find this specific text later. - Add the Buttons: Below the recipe name, add two
<button>elements.- Give the first button the ID
id="yummy-button-1"and the text “❤️ Yummy!”. - Give the second button the ID
id="silly-button-1"and the text “🤪 Make Silly!”.
- Give the first button the ID
Here’s how the HTML for the first recipe div should look after these changes:
<div class="recipe">
    <img src="https://rakskitchen.net/wp-content/uploads/2014/06/14336259454_504e87ce37_z.jpg">
    <p id="recipe-name-1">Baingan Bharta</p>  <!-- Added ID recipe-name-1 -->
    <button id="yummy-button-1">❤️ Yummy!</button> <!-- Added ID yummy-button-1 -->
    <button id="silly-button-1">🤪 Make Silly!</button> <!-- Added ID silly-button-1 -->
</div>
Step 2: Add the JavaScript for the First Recipe
Now, let’s write the JavaScript code in script.js to make the first recipe’s buttons work.
- Find the “Yummy” Button (#1) and Add Behavior:
- We use
document.getElementById('yummy-button-1')to find the first yummy button using its unique ID. We store a reference to it in a constant variable calledyummyButton1. - We then use
addEventListener('click', ...)onyummyButton1. This tells the browser to listen for a ‘click’ event on this specific button. - When the button is clicked, the code inside the arrow function
() => { ... }runs. In this case, it usesalert()to display a pop-up message.

- We use
- Find the “Silly” Button (#1) and Recipe Name (#1), and Add Behavior:
- Similar to the yummy button, we find the first silly button using
document.getElementById('silly-button-1')and store it insillyButton1. - We also need to find the first recipe name paragraph using
document.getElementById('recipe-name-1')and store it inrecipeName1. - We add another click event listener to the
sillyButton1. - When this button is clicked, the code inside its arrow function runs:
recipeName1.textContent = recipeName1.textContent + ' SUPER DELUXE!'. This takes the current text inside the<p id="recipe-name-1">tag (recipeName1.textContent), adds the string" SUPER DELUXE!"to the end of it, and updates the paragraph’s content on the page.
- Similar to the yummy button, we find the first silly button using
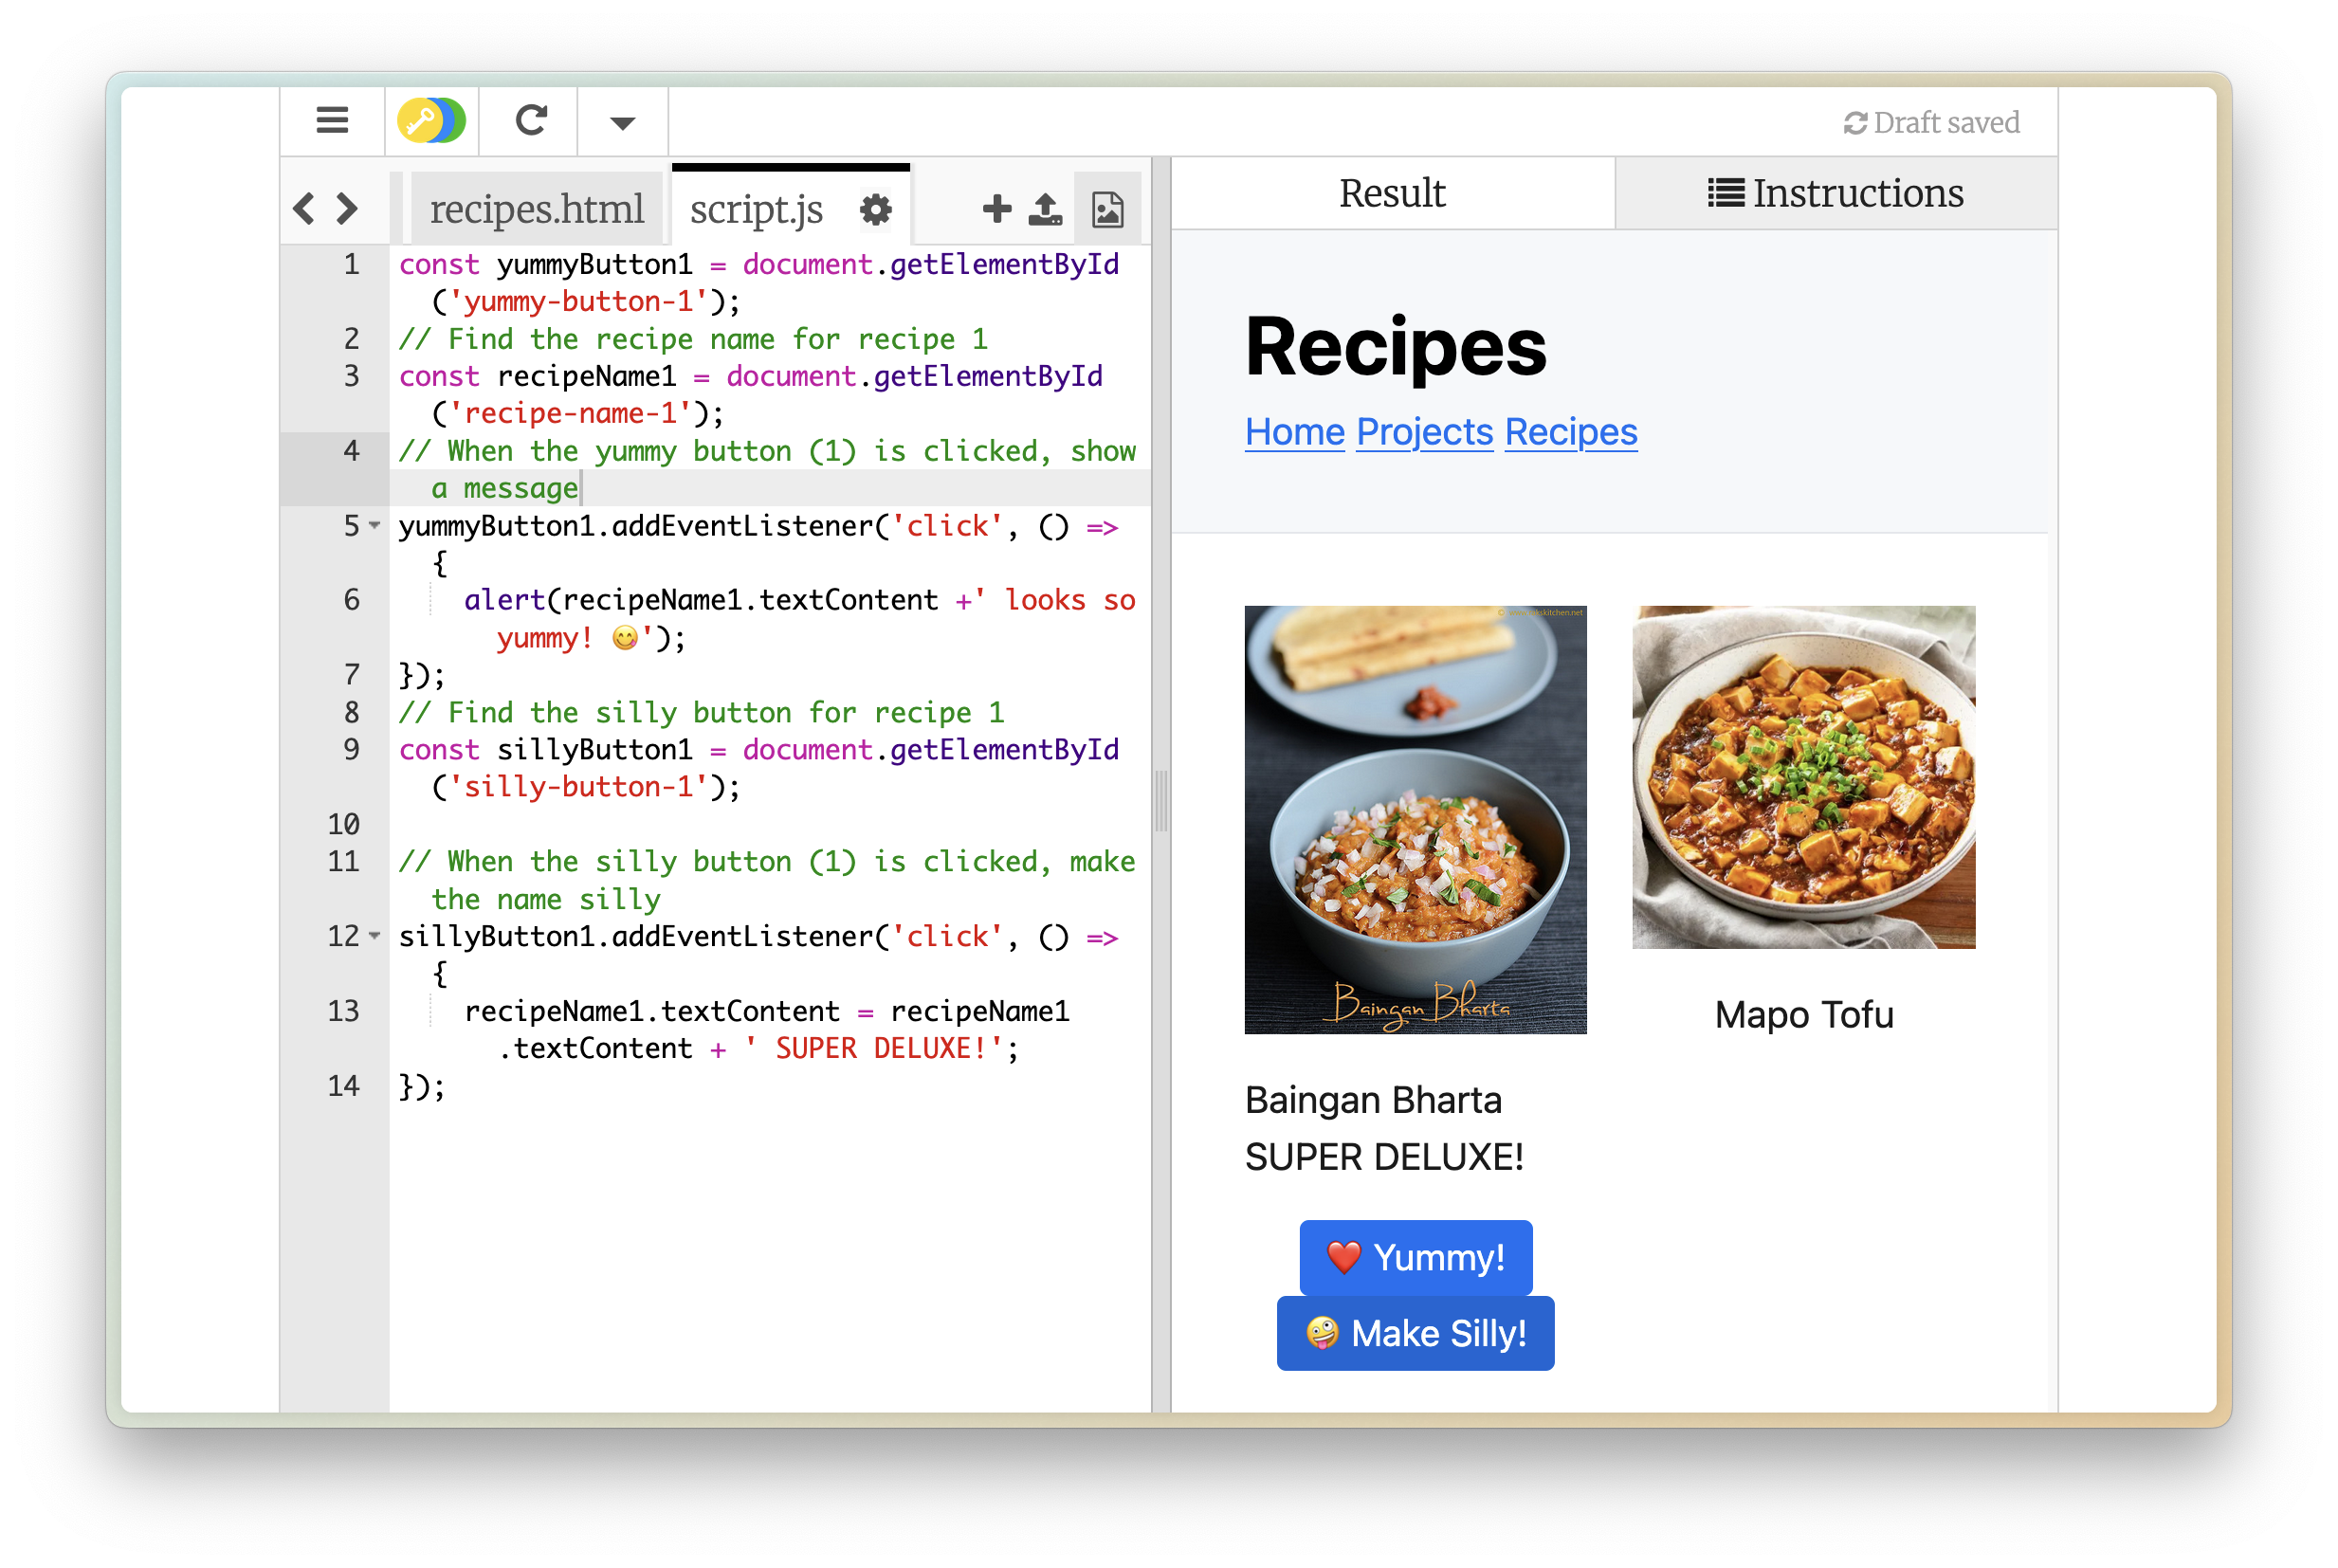
Here is the JavaScript code for the first recipe’s buttons. Add this to your script.js file:
// --- Recipe 1 ---

// Find the yummy button for recipe 1
const yummyButton1 = document.getElementById('yummy-button-1');
// Find the recipe name for recipe 1  (Needed for both buttons now)
const recipeName1 = document.getElementById('recipe-name-1');
// When the yummy button (1) is clicked, show a dynamic message
yummyButton1.addEventListener('click', () => {
    // Use recipeName1.textContent to get the current name
    alert(`${recipeName1.textContent} looks so yummy! 😋`);
});

// Find the silly button for recipe 1
const sillyButton1 = document.getElementById('silly-button-1');
// When the silly button (1) is clicked, make the name silly
sillyButton1.addEventListener('click', () => {
    recipeName1.textContent = recipeName1.textContent + ' SUPER DELUXE!';
});

Step 3: Repeat for the Second Recipe (HTML)
Now, repeat Step 1 for the second <div class="recipe"> in your recipes.html.
- Wrap the name (e.g., “Mapo Tofu”) in a
<p>tag, but give it the unique IDid="recipe-name-2". - Add the two buttons below the name, but give them the unique IDs
id="yummy-button-2"andid="silly-button-2".
Why unique ids? JavaScript needs a unique id to know exactly which element you want to interact with. Using -1 for the first recipe and -2 for the second helps keep them distinct.
Your second recipe div should look like this:
<!-- Second Recipe -->
<div class="recipe">
    <img src="https://www.cookerru.com/wp-content/uploads/2022/06/mapo-tofu-recipe-preview-feature-500x500.jpg">
    <p id="recipe-name-2">Mapo Tofu</p> <!-- Unique ID: recipe-name-2 -->
    <button id="yummy-button-2">❤️ Yummy!</button> <!-- Unique ID: yummy-button-2 -->
    <button id="silly-button-2">🤪 Make Silly!</button> <!-- Unique ID: silly-button-2 -->
</div>
Step 4: Repeat for the Second Recipe (JavaScript)
Now, let’s add the JavaScript for the second recipe’s buttons. Instead of writing it from scratch, we can copy, paste, and modify the code we wrote for the first recipe in Step 2.
- Copy the entire block of JavaScript code you added in Step 2 (from
// --- Recipe 1 ---down to the closing});). - Paste it directly below the existing code in
script.js. - Modify the pasted code block:
- Change the comment to
// --- Recipe 2 ---. - Change all the
getElementByIdcalls to use the IDs ending in-2(e.g.,'yummy-button-2','silly-button-2','recipe-name-2'). - Change the variable names to end in
2(e.g.,yummyButton2,sillyButton2,recipeName2). Make sure theaddEventListenercalls use these new variable names. - Optional: Change the text in the
alert()and the text added by the silly button (e.g.,' MEGA EXTRA!') to make it different from recipe 1.
- Change the comment to
Your added JavaScript for the second recipe should look like this:
// --- Recipe 2 --- (Copied and modified from Recipe 1)

// Find the yummy button for recipe 2
const yummyButton2 = document.getElementById('yummy-button-2'); // Changed ID and variable name
// Find the recipe name for recipe 2 (Needed for both buttons now)
const recipeName2 = document.getElementById('recipe-name-2'); // Changed ID and variable name
// When the yummy button (2) is clicked, show a dynamic message
yummyButton2.addEventListener('click', () => { // Used yummyButton2
    // Use recipeName2.textContent
    alert(`${recipeName2.textContent} also looks yummy! 👍`); // Optional: Changed message
});

// Find the silly button for recipe 2
const sillyButton2 = document.getElementById('silly-button-2'); // Changed ID and variable name
// When the silly button (2) is clicked, make the name silly
sillyButton2.addEventListener('click', () => { // Used sillyButton2
    recipeName2.textContent = recipeName2.textContent + ' MEGA EXTRA!'; // Used recipeName2, Optional: Changed text
});
Now, try clicking both buttons on your webpage!
- The heart button should show a pop-up message.
- The silly button should add
"SUPER DELUXE!"or"MEGA EXTRA!"to the end of your recipe name each time you click it.

How Does It Work?
Let’s recap the JavaScript logic:
- Finding Elements: We use
document.getElementById('some-id')to get a reference to specific HTML elements based on their uniqueIDs. This is how our JavaScript knows which button or paragraph to interact with. - Event Listeners:
addEventListener('click', ...)attaches a function to an element that runs only when a specific event (like a ‘click’) happens on that element. - Manipulating Content: We used
alert()to show a simple pop-up andelement.textContent = ...to read and change the text displayed within an HTML element.
Extra Challenge
Try these fun changes:
- Add a number next to the like which increases when someone clicks on it.
- Change
"SUPER DELUXE!"to something else silly. - Change the
alertto aconfirm()and change the text.
What’s Next?
JavaScript can do so much more! You can:
- Create animations
- Build games
- Connect to databases
- Create mobile apps
Final Code
Here’s the final code for both files after completing the workshop steps for both recipes.
recipes.html (Based on the starter code, with modifications to both recipes)
<head>
    <title>Recipes</title>
    <link rel="stylesheet" href="https://cdn.jsdelivr.net/npm/@exampledev/new.css@1.1.2/new.min.css">
    <link rel="stylesheet" href="styles.css">
    <script src="script.js" defer></script> <!-- Added script tag -->
</head>
<body>
<header>
    <h1>Recipes</h1>
        <nav>
            <a href="index.html">Home</a>
            <a href="projects.html">Projects</a>
            <a href="recipes.html">Recipes</a>
        </nav>
    </header>
    <div class="container">
      <!-- First Recipe -->
      <div class="recipe">
            <img src=https://rakskitchen.net/wp-content/uploads/2014/06/14336259454_504e87ce37_z.jpg>
            <p id="recipe-name-1">Baingan Bharta</p> <!-- Unique ID -->
            <button id="yummy-button-1">❤️ Yummy!</button> <!-- Unique ID -->
            <button id="silly-button-1">🤪 Make Silly!</button> <!-- Unique ID -->
      </div>
      <!-- Second Recipe -->
      <div class="recipe">
            <img src=https://www.cookerru.com/wp-content/uploads/2022/06/mapo-tofu-recipe-preview-feature-500x500.jpg>
            <p id="recipe-name-2">Mapo Tofu</p> <!-- Unique ID -->
            <button id="yummy-button-2">❤️ Yummy!</button> <!-- Unique ID -->
            <button id="silly-button-2">🤪 Make Silly!</button> <!-- Unique ID -->
      </div>
    </div>
</body>
// --- Recipe 1 ---

// Find the yummy button for recipe 1
const yummyButton1 = document.getElementById('yummy-button-1');
// Find the recipe name for recipe 1
const recipeName1 = document.getElementById('recipe-name-1');
// When the yummy button (1) is clicked, show a dynamic message
yummyButton1.addEventListener('click', () => {
    alert(`${recipeName1.textContent} looks so yummy! 😋`);
});

// Find the silly button for recipe 1
const sillyButton1 = document.getElementById('silly-button-1');
// When the silly button (1) is clicked, make the name silly
sillyButton1.addEventListener('click', () => {
    recipeName1.textContent = recipeName1.textContent + ' SUPER DELUXE!';
});

// --- Recipe 2 ---

// Find the yummy button for recipe 2
const yummyButton2 = document.getElementById('yummy-button-2');
// Find the recipe name for recipe 2
const recipeName2 = document.getElementById('recipe-name-2');
// When the yummy button (2) is clicked, show a dynamic message
yummyButton2.addEventListener('click', () => {
    alert(`${recipeName2.textContent} also looks yummy! 👍`);
});

// Find the silly button for recipe 2
const sillyButton2 = document.getElementById('silly-button-2');
// When the silly button (2) is clicked, make the name silly
sillyButton2.addEventListener('click', () => {
    recipeName2.textContent = recipeName2.textContent + ' MEGA EXTRA!';
});